Last updated on: 2026-05-26 | Updated by: MAGNI Docs Team
Reporting Scheduler Setup
The Admin Reporting Scheduler page allows administrators to manage automated reporting schedules and configure the stakeholders who receive these reports. This tool helps keep team members, department heads, and external contacts informed about process or product checklist completion and compliance metrics automatically.
👤 Visible to: Administrators and System Administrators
Page Sections
Breadcrumb Navigation
Located at the top of the page, this helper path allows you to quickly navigate back to the Admin Dashboard or the main Checklists list page. The second link dynamically changes depending on whether you are managing Process Checklists or Product Checklists.
Feature Access Restrictions
If certain system features are not enabled for your organization, you will see a warning message instead of the scheduling interface:
- Checklists Feature Disabled: This message appears if the core Checklist module (Process or Product Checklists) is turned off for your account.
- Reporting Scheduler Feature Disabled: This message appears if the automated reporting scheduler add-on is not active.
Stakeholders Tab
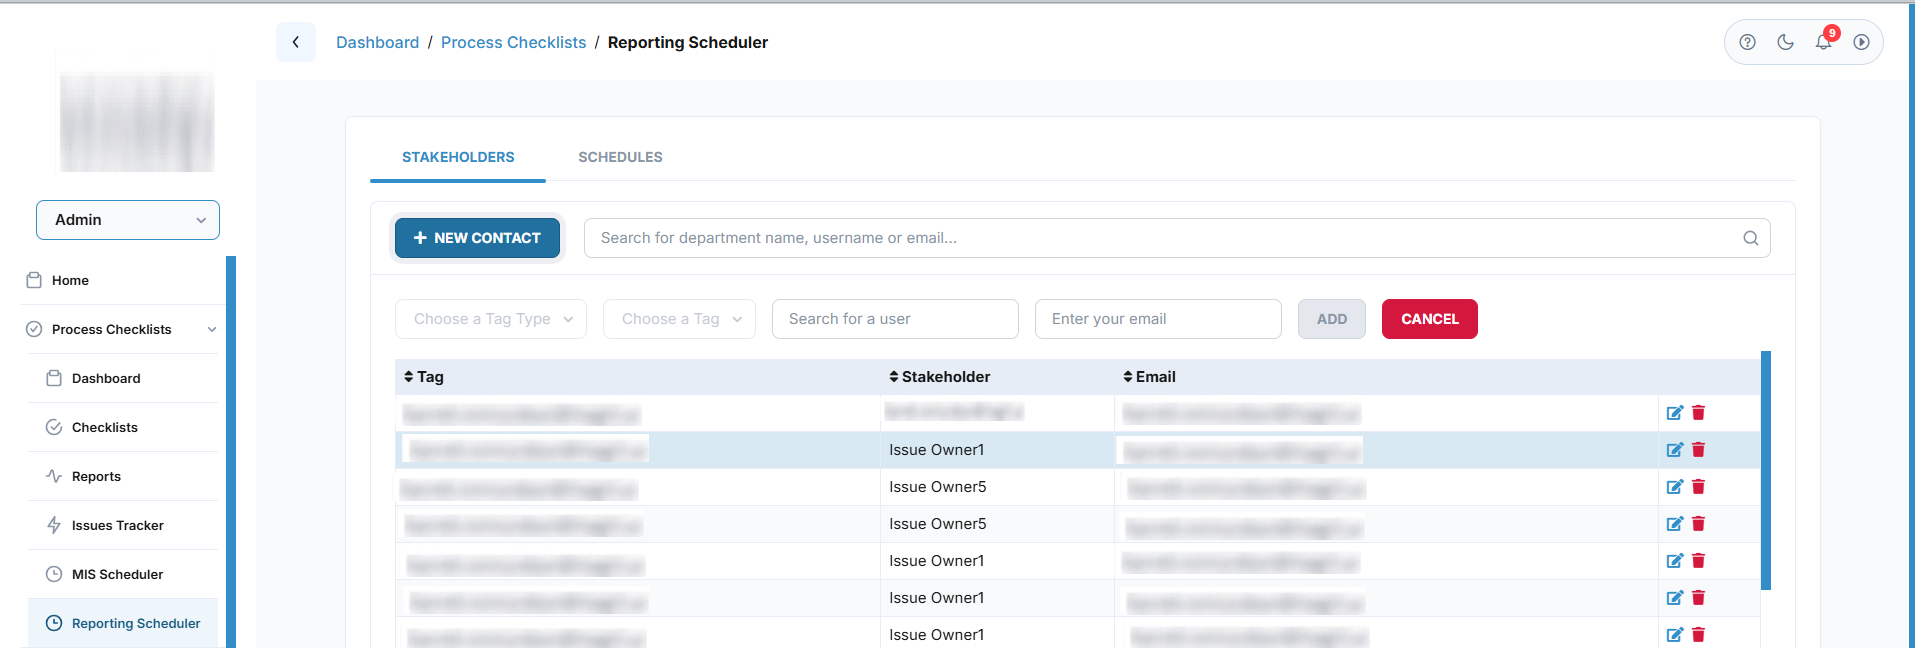
This tab is selected by default and allows you to manage the contact list of individuals or departments who need to receive scheduled reports.

Within this tab, you can access the following controls:
- + New Contact Button: Opens the configuration form to add a new stakeholder to your reporting list.
- Search Bar: Allows you to filter the list of existing stakeholders. You can search by department name, username, or email address.
Common Actions
| Action | How to do it |
|---|---|
| Switch between tabs | Click on either the Stakeholders or Schedules tab at the top of the card interface. |
| Search for a stakeholder | Select the Stakeholders tab, click into the search bar, and type the department name, username, or email address. |
| Add a new contact | Select the Stakeholders tab and click the blue + New Contact button. |
Tips
- Keep Contact Info Updated: Regularly review the Stakeholders tab to ensure that department names and email addresses are correct so that automated reports are delivered successfully.
- Use Search Filters: When managing a large organization with many stakeholders, use the search bar to quickly find and verify if a specific department or email is already registered before adding a duplicate contact.
Schedules Tab
This tab allows you to configure and manage the automated schedules for sending out reports. Switch to this tab to view, edit, or create new automated reporting intervals.
The Reporting Scheduler Detail page allows administrators to configure, edit, and manage automated email schedules for system reports related to Process or Product Checklists. This feature ensures that key stakeholders receive regular, automated updates on checklist performance, non-conformances, and issue statuses.
Page Sections
Header Actions
The header contains breadcrumb navigation and primary actions for managing the schedule configuration.
👤 Role-Based Access: Saving and deleting schedules is restricted to users with update and delete permissions for the Reporting Scheduler.
- Cancel: Discards any unsaved changes and returns you to the Reporting Scheduler list page.
- Save: Saves the current schedule configuration. This button is only active when all required fields in the form are valid.
- Delete: Permanently deletes the scheduled report. This button is only visible when editing an existing schedule.
Scheduler Setup
This section contains the core configuration fields for defining when and how the report is generated.
- Report (Required): Select the system report you want to schedule from the dropdown list.
- Status Toggle (Enabled/Disabled): Use this switch to turn the schedule on or off. Disabled schedules will not run.
- Interval (Required): Choose how frequently the report should run (e.g., Daily, Weekly, Monthly).
- Day of Week / Date of Month (Conditional):
- If Daily is selected: A multi-select dropdown appears allowing you to choose which days of the week the report runs.
- If Weekly is selected: A single-select dropdown appears to choose the specific day of the week the report runs.
- If Monthly is selected: A dropdown appears to choose whether the report runs on the "First day of the month" or the "Last day of the month".
- Time (Required): Enter or select the specific time of day for the report to run using the 12-hour timepicker.
- Next Schedule Date (Conditional): Displays the calculated date and time for the next automated run. This is only visible when editing an existing schedule.
- Send email only if the report has data: Check this box to prevent blank reports from being emailed to stakeholders when there is no new data.
- Run for current day (Conditional): This checkbox only appears if the interval is set to Daily and the selected report is the Checklist Non-Conformance Report.
- Send reports to Issues Owner (Conditional): This checkbox only appears if the selected report is either the Checklist Issue Status Report or the Checklist Open Issues Ageing Report. Checking this box automatically routes the report to the assigned issue owners and hides the Stakeholders selection table.
Select Stakeholders
This section is only visible when Send reports to Issues Owner is unchecked. Use it to specify which departments or user groups should receive the scheduled report.
- Search: Filter the list of stakeholders by typing a tag name or email address.
- All Checkbox: Selects or deselects all tags in the list.
- Primary: Indicates whether the tag is designated as a primary contact group.
- Tag: The name of the department or stakeholder group tag. Click the column header to sort.
- Email IDs linked to the Tag: Displays the email addresses associated with each tag. Click the column header to sort.
Common Actions
| Action | How to do it |
|---|---|
| Enable or Disable a Schedule | Toggle the switch next to the Report dropdown field to "Enabled" or "Disabled", then click Save. |
| Change the Run Time | Click inside the Time input field, use the timepicker to select the hour, minute, and AM/PM, then click Save. |
| Delete a Schedule | Click the red Delete button in the top right corner of the page, then confirm the action in the pop-up dialog. |
Tips
- Reduce Inbox Clutter: Always check the Send email only if the report has data option to ensure stakeholders only receive emails when there are actionable checklist results or non-conformances.
- Automate Issue Follow-ups: When scheduling the Checklist Issue Status Report, check the Send reports to Issues Owner box to automatically target the users responsible for resolving open items, saving you from manually selecting individual stakeholder tags.