Last updated on: 2026-05-26 | Updated by: MAGNI Docs Team
Reporting Scheduler - Edit
The Admin Reporting Scheduler for Product Checklists allows administrators to manage automated reporting schedules and configure the stakeholders who receive these reports. This page helps ensure that the right team members automatically receive timely updates on product checklist completion and compliance.
👤 Visible to: Administrators and System Administrators
Page Sections
Breadcrumb Navigation
The breadcrumb trail at the top of the page allows you to quickly navigate back to the Dashboard or the main Product Checklists page.
Feature Access Restrictions
To access the Reporting Scheduler, your organization must have both the Checklists (specifically Product Checklists) and the Reporting Scheduler features enabled. If either feature is disabled, you will see a message indicating that the feature is not enabled instead of the scheduler interface.
Main Scheduler Interface
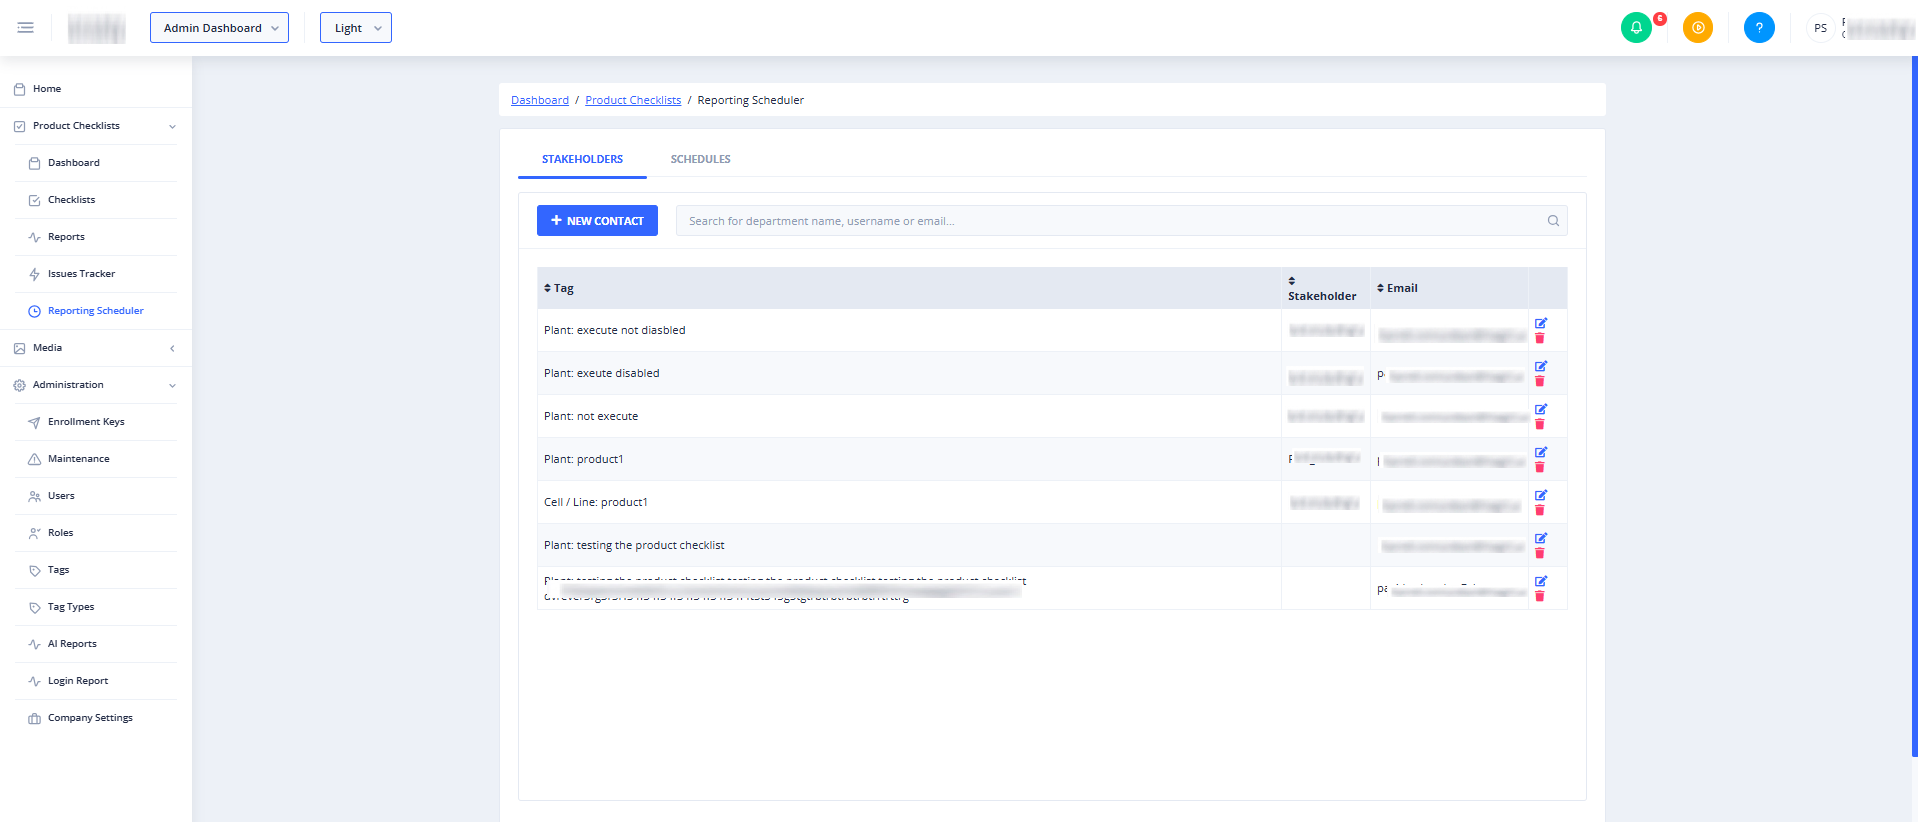
Once the required features are enabled, the page displays two primary tabs for managing your reporting configurations: Stakeholders and Schedules.
Stakeholders Tab
This tab is active by default and allows you to manage the contacts who are eligible to receive scheduled reports.
- + NEW CONTACT Button: Click this button to add a new stakeholder contact to your reporting list.
- Search Bar: Use this search field to filter the list of stakeholders. You can search by department name, username, or email address.

Schedules Tab
Click this tab to view, create, and manage the active automated reporting schedules. This is where you define how frequently reports are sent and which stakeholders receive them.
Common Actions
| Action | How to do it |
|---|---|
| Add a new stakeholder | Click the + NEW CONTACT button on the Stakeholders tab and complete the contact details form. |
| Search for a stakeholder | Type a department name, username, or email into the search bar on the Stakeholders tab to filter the list. |
| Manage reporting schedules | Click the Schedules tab to view, edit, or create automated report delivery configurations. |
Tips
- Keep Contact Info Updated: Regularly review the Stakeholders tab to ensure that email addresses and department assignments are correct so that automated reports always reach the active team members.
- Utilize Search Filters: If your organization has a large number of stakeholders, use the search bar to quickly find specific individuals by their department rather than scrolling through the entire list.
- Verify Feature Permissions: If you see a "Feature Not Enabled" message, contact your system administrator to verify that both "Product Checklists" and "Reporting Scheduler" features are enabled for your customer account.
The Admin Reporting Scheduler page allows administrators to set up, edit, and manage automated email schedules for checklist reports. This feature ensures that stakeholders receive regular updates on checklist compliance, issue status, and non-conformances directly in their inbox.
Page Sections
Header Actions
The header area contains navigation breadcrumbs and primary actions for managing the schedule.
- Cancel Button: Discards any unsaved changes and returns you to the Reporting Scheduler list page.
- Save Button: Saves the current schedule configuration. This button is only active when all required fields in the form are filled out correctly.
👤 Role Restriction: Only visible to users with Reporting Scheduler Update permissions.
- Delete Button: Permanently deletes the scheduled report. This button is only visible when editing an existing schedule.
👤 Role Restriction: Only visible to users with Reporting Scheduler Delete permissions.
Scheduler Setup
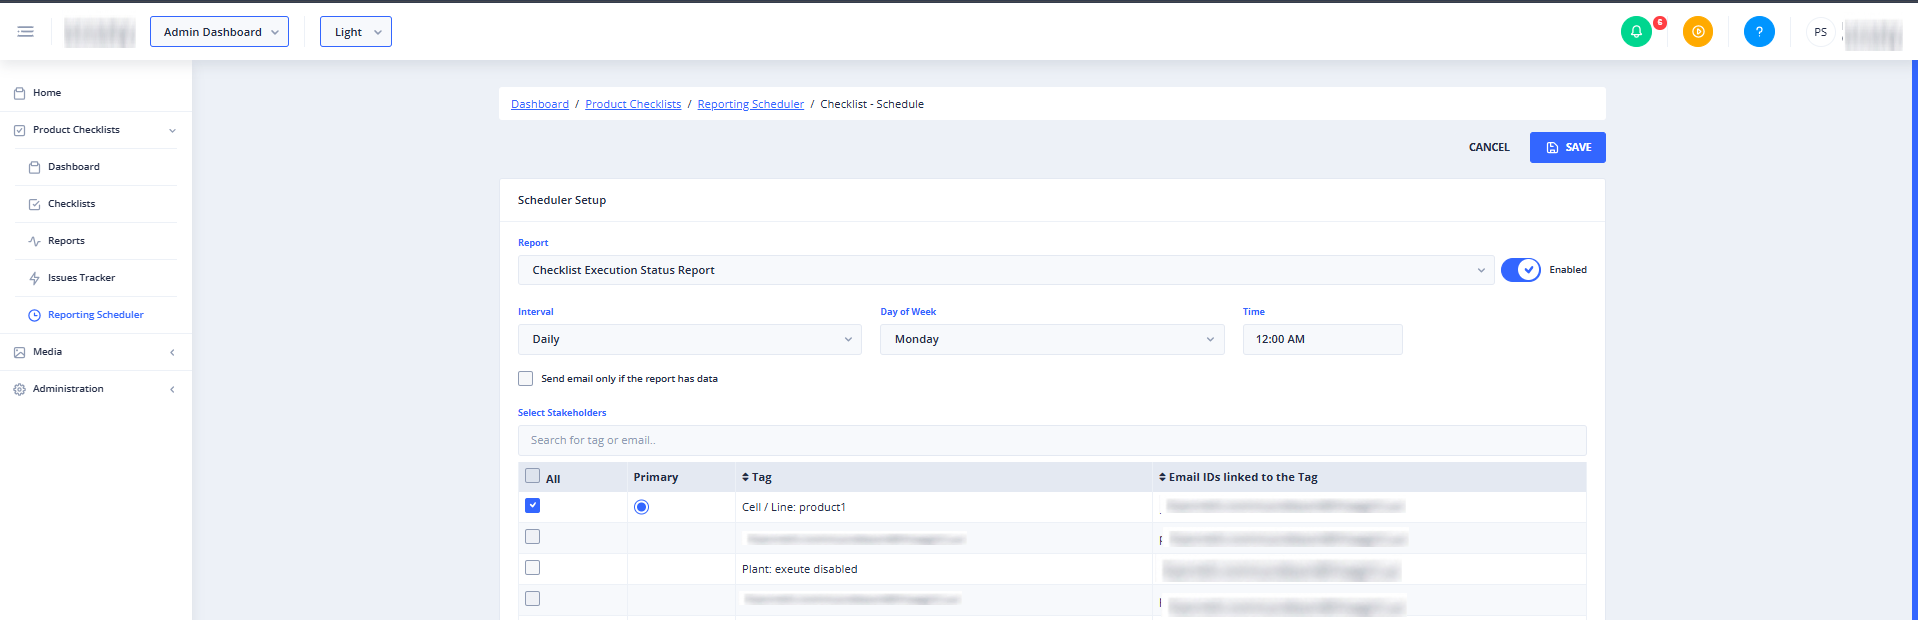
This section configures the report type, frequency, and timing for the automated delivery.
- Report (Required): A dropdown menu to select which system report you want to schedule. You must select a report before you can configure the interval.
- Enabled / Disabled Toggle: A switch to quickly activate or deactivate the schedule. When disabled, the report will not run at its scheduled time.
- Interval (Required): Choose how often the report should be generated and sent. Depending on your selection, additional conditional fields will appear:
- Daily: Displays a Day of Week multi-select dropdown where you can choose specific days of the week for the report to run.
- Weekly: Displays a Day of Week single-select dropdown to choose one specific day of the week.
- Monthly: Displays a Date of Month dropdown with options for "First day of the month" or "Last day of the month".
- Time: A time input field with a 12-hour format timepicker to specify the exact time the report should run.
- Next Schedule Date: Only visible when editing an existing schedule. Displays the next date and time the system is scheduled to run and send the report.
- Send email only if the report has data: A checkbox that prevents empty emails. When checked, the system will only send the scheduled email if the report contains records.
- Run for current day: A checkbox that appears only if the selected interval is "Daily" and the selected report is "Checklist Non-Conformance Report".
- Send reports to Issues Owner: A checkbox that appears only if the selected report is "Checklist Issue Status Report" or "Checklist Open Issues Ageing Report". When checked, the report is automatically routed to the respective issue owners, and the Select Stakeholders section below is hidden.
Select Stakeholders
This section allows you to define who will receive the scheduled report. It is only visible when Send reports to Issues Owner is unchecked.
Search Bar: Use this search input to filter the list of stakeholders by their tag name or email address.

Stakeholders Table:
- All Checkbox: Selects or deselects all stakeholders currently listed in the table.
- Primary: Indicates whether the stakeholder is designated as a primary recipient.
- Tag: Displays the stakeholder group tag. You can click the column header to sort the list by tag name.
- Email IDs linked to the Tag: Displays the email addresses associated with the tag. You can click the column header to sort the list by email addresses.
Common Actions
| Action | How to do it |
|---|---|
| Create a New Schedule | 1. Select a report from the Report dropdown. 2. Choose an Interval (Daily, Weekly, or Monthly) and fill out the corresponding day/date fields. 3. Set the delivery Time using the timepicker. 4. Select the target stakeholders in the table. 5. Click Save. |
| Temporarily Pause a Schedule | 1. Open the scheduled report in edit mode. 2. Toggle the switch next to the report name to Disabled. 3. Click Save. |
| Send Reports Only to Issue Owners | 1. Select either "Checklist Issue Status Report" or "Checklist Open Issues Ageing Report" in the Report dropdown. 2. Check the Send reports to Issues Owner checkbox. 3. Click Save. |
| Delete a Schedule | 1. Open the scheduled report in edit mode. 2. Click the Delete button in the top-right corner. 3. Confirm the deletion in the pop-up dialog. |
Tips
- Avoid Empty Inboxes: Always check the Send email only if the report has data option to ensure stakeholders only receive emails when there are actual updates or actions required.
- Targeted Delivery: If you are scheduling issue-related reports, use the Send reports to Issues Owner option to ensure the data goes directly to the individuals responsible for resolving those issues, rather than emailing an entire department tag.
- Check Next Run Times: When editing an existing schedule, review the Next schedule date label to verify that your interval and time settings align with your expectations.