Product Checklists - MIS Schedules
Last updated on: July 17, 2026 | Updated by: MAGNI Docs Team
The Admin Checklists Product MIS Scheduler page allows administrators to manage and automate Management Information System (MIS) schedules for Product Checklists. From this central dashboard, authorized users can create new schedules, track execution history, view assigned users and reports, and toggle schedules active or inactive.
Page Sections
Control Bar
This section at the top of the page provides quick access to creating new schedules and searching existing ones.
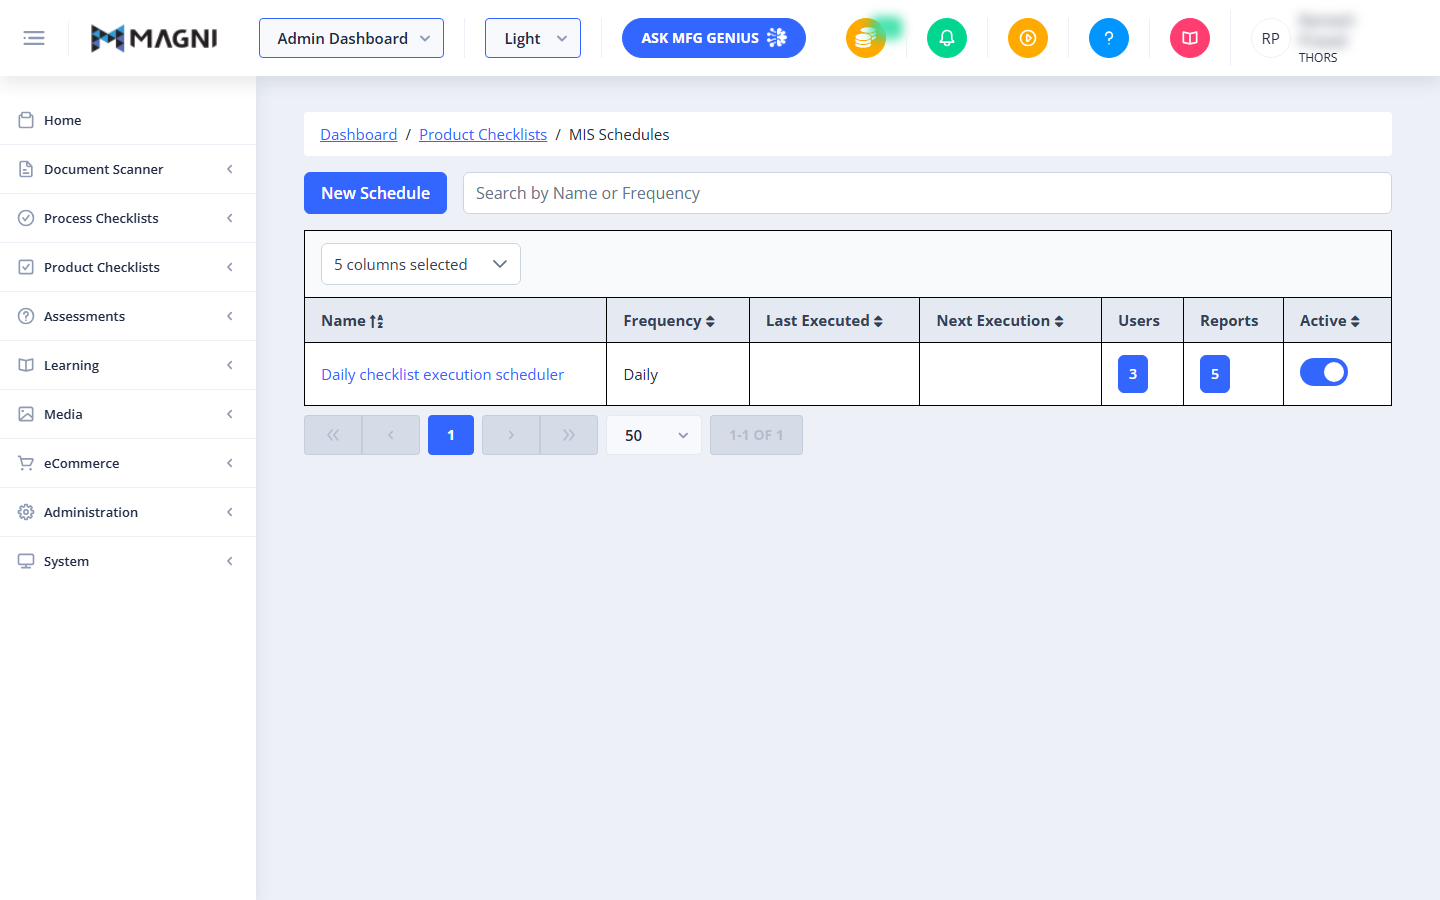
- New Schedule Button: Click this button to navigate to the schedule creation form where you can set up a new checklist execution schedule.
- Search Bar: Type in this field to filter the schedules list dynamically. You can search by the schedule's name or its frequency.
Schedules Table
The main table displays all configured MIS schedules according to your search and filter criteria.

- Column Chooser: Located directly above the table headers, this dropdown allows you to customize your view by selecting which columns to display. You can choose from:
- Frequency
- Last Executed
- Next Execution
- Users
- Reports
- Modified By
- Last Modified
- Created By
- Created
- Name: Displays the name of the schedule. Clicking the name link opens the editor for that specific schedule.
- Frequency: Shows how often the schedule runs (e.g., Daily).
- Last Executed: Displays the date and time the schedule was last run.
- Next Execution: Displays the upcoming scheduled run date and time.
- Users: Displays a button showing the total number of users assigned to the schedule. Clicking this button opens a modal dialog listing all assigned user names.
- Reports: Displays a button showing the total number of reports associated with the schedule. Clicking this button opens a modal dialog listing all associated reports.
- Active: A toggle switch that enables or disables the schedule. Toggling this immediately updates the schedule's status and displays a confirmation message.
- Pagination: Located at the bottom of the table, this control allows you to navigate through multiple pages of schedules and adjust the number of records displayed per page (default is 50).
Common Actions
| Action | How to do it |
|---|---|
| Create a New Schedule | Click the New Schedule button at the top left of the page. |
| Edit an Existing Schedule | Click the blue linked name of the schedule in the Name column. |
| Search for a Schedule | Type the schedule's name or frequency into the Search by Name or Frequency input field. |
| Toggle Schedule Status | Click the toggle switch in the Active column. A "Schedule Updated Successfully" notification will appear. |
| View Assigned Users | Click the blue button in the Users column to open the Users list modal. |
| View Assigned Reports | Click the blue button in the Reports column to open the Reports list modal. |
| Customize Table Columns | Click the column selector dropdown above the table, then check or uncheck columns to update your view. |
| Sort Table Records | Click any sortable column header (such as Name, Frequency, Last Executed, Next Execution, or Active) to sort the records in ascending or descending order. |
Tips
- Use Descriptive Names: When creating or editing schedules, use clear and descriptive names that indicate both the frequency and the target audience (e.g., "Daily checklist execution scheduler") to make searching easier.
- Temporarily Pause Schedules: Instead of deleting a schedule that is temporarily not needed, use the Active toggle switch to pause it. This preserves all configuration settings for future use.
- Optimize Your View: Use the column chooser to hide columns you do not frequently need, such as "Created By" or "Created Date", to keep your workspace clean and focused on execution times.