Product Checklists - MIS Scheduler — Edit
Last updated on: July 17, 2026 | Updated by: MAGNI Docs Team
This page allows administrators to set up and manage automated schedules for Management Information System (MIS) reports. These schedules automatically generate and distribute checklist reports to designated users at specified intervals, ensuring key stakeholders receive regular updates on checklist compliance and performance.
👤 Visible to: Administrator, Checklist Administrator, QA Manager, QA Supervisor, MFG Supervisor, Issues Owner, and Checklist Reports Owner
Page Sections
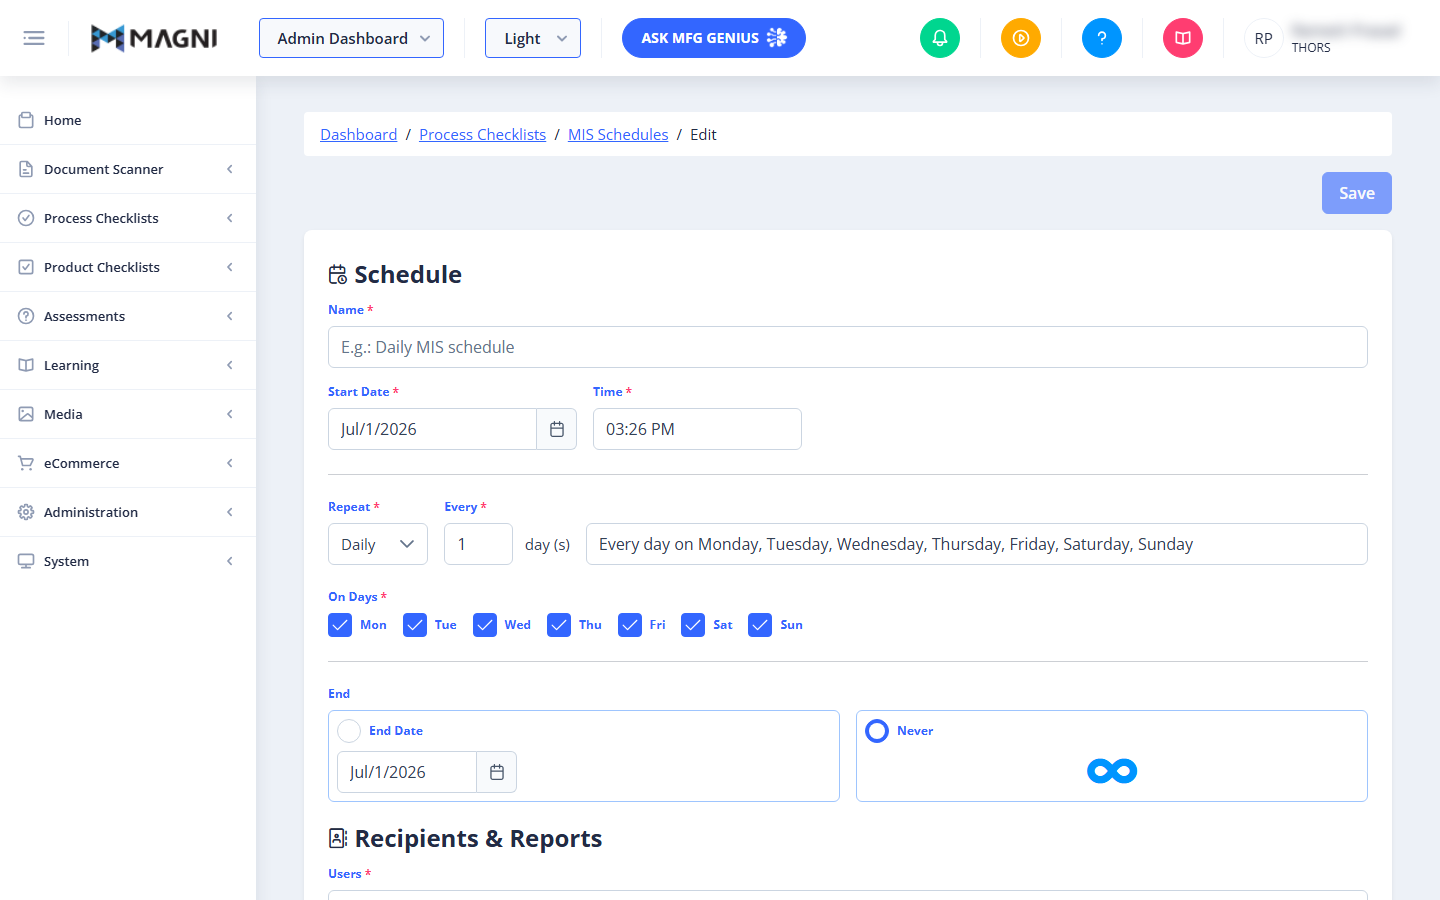
Header Actions
The top-right corner of the page contains the primary actions for managing the schedule:
- Cancel: Discards any unsaved changes and returns you to the MIS Schedules list. This button is disabled while saving or deleting.
- Save: Validates and saves the schedule configuration. This button is disabled while saving or deleting.
- Delete: (Only visible when editing an existing schedule) Permanently deletes the schedule. Clicking this triggers a confirmation dialog before removal.
Schedule Card
This section configures when and how often the MIS report runs.
- Name (Required): A descriptive name for the schedule (e.g., "Daily MIS Schedule").
- Start Date (Required): The date when the schedule should begin running.
- Time (Required): The specific time of day the report should be generated and sent.
- Repeat (Required): The frequency of the schedule (e.g., Daily, Weekly).
- Every (Required): The interval multiplier (e.g., every "1" day, every "2" weeks).
- On Days: (Appears when Weekly frequency is selected) Checkboxes to choose which days of the week the schedule runs.
- End: Determines when the schedule stops running:
- End Date: Select a specific date for the schedule to expire. The end date must be on or after the start date.
- Never: The schedule runs indefinitely.
Recipients & Reports Card
This section configures who receives the reports and what data they contain.
- Users (Required): Select the users who will receive the generated reports. You can select up to 10 users. Selected users are displayed as individual cards below the dropdown, showing their name, username, and email. You can remove a user by clicking the "X" button on their card.
- Tag Type (Required): Select the category of tags to filter the reports by.
- Tags: Select specific tags within the chosen Tag Type to filter the checklist data. Selected tags appear as removable chips.
- Categories: Select specific checklist categories to include in the report.
- Widgets (Required): Select the widgets (data visualizations or tables) to include in the report.
- Checklists: Select specific checklists to target for this schedule.
- Previous Day: Data will be qualified for the previous day from 12:00 AM to 11:59 PM
- Current Day: Data will be qualified for the current day from 12:00 AM to [current time]
Common Actions
| Action | How to do it |
|---|---|
| Create/Edit a Schedule | Fill in all required fields in the Schedule and Recipients & Reports sections, then click Save in the top-right corner. |
| Remove a Recipient | Locate the user's card under the Users field and click the small "X" button in the top-right corner of their card. |
| Remove a Tag | Click the "X" on the tag's chip displayed below the Tags field. |
| Delete a Schedule | Click the Delete button in the top-right corner (only available in edit mode) and confirm the action in the pop-up dialog. |
Tips
- Recipient Limit: You can add a maximum of 10 users to a single schedule. If more users need the report, consider setting up a secondary schedule or distributing the report manually.
- End Date Validation: Ensure your "End Date" is set to a future date relative to your "Start Date." The system will display an error and prevent saving if the end date occurs before the start date.
- Use Descriptive Names: Name your schedules clearly based on their frequency and target audience (e.g., "Weekly QA Supervisor MIS Report") to make them easy to identify on the main schedules list.