Login Report
Last updated on: 2026-05-26 | Updated by: MAGNI Docs Team
The Login Report page allows administrators to track, monitor, and analyze user login activity within the Magni LMS. This report is used by administrators to audit system usage, verify user engagement, and export login history for compliance or internal reporting.
Page Sections
Header Controls
The header toolbar provides global controls to adjust the report's layout, refresh the data, and apply high-level filters.
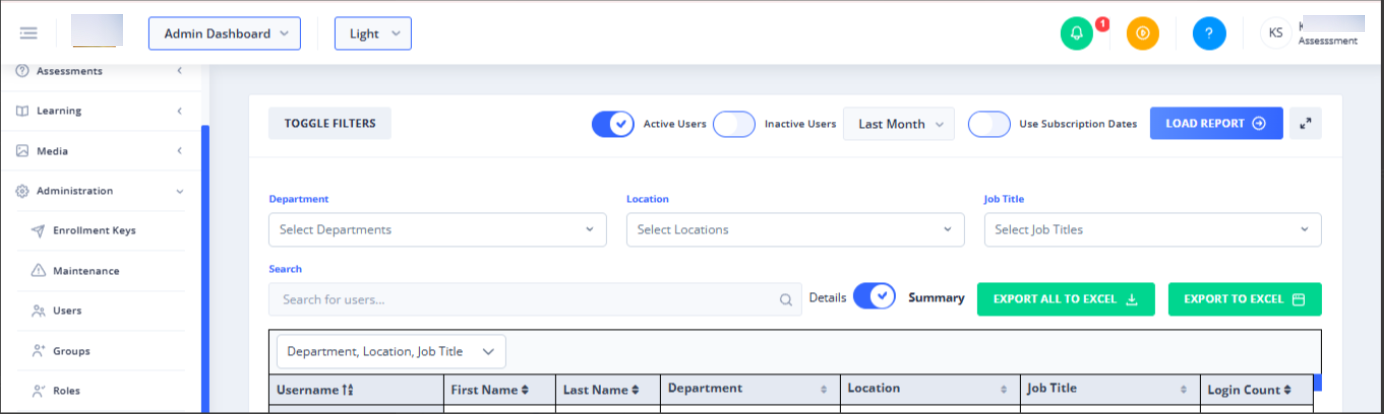
- Toggle Filters Button: Shows or hides the advanced filtering panel (Department, Location, Job Title, and Customer filters).
- Report Header Controls:
- Active/Inactive Status Filters: Filter the report to show active users, inactive users, or both.
- Date Range Selector: Filter login records within a specific start and end date.
- Refresh Button: Reloads the login data with the currently selected filters.
- Maximize Button: Expands the report card to fill the entire screen for easier viewing.
Filters Panel
The filters panel allows you to narrow down the report data based on organizational structures and user attributes.
👤 Customer Filter: The customer and subscription type filters are only visible to THORS Administrators. Standard customer administrators will only see filters relevant to their own organization.
- Customer Filter (THORS Admins Only): Select a specific customer organization and subscription type (e.g., Demo, Trial, eCommerce, Paid Pilot) to view their login data.
- Department: Multi-select dropdown to filter logins by one or more departments. If the list of departments is long, click the Show more... button at the bottom of the dropdown to load more options.
- Location: Multi-select dropdown to filter logins by physical locations. Click Show more... to load additional locations.
- Job Title: Multi-select dropdown to filter logins by specific job roles. Click Show more... to load additional job titles.
Search and Export Controls
This section allows you to search for specific users, toggle the report layout, and export the dataset.
- Search Bar: Type a user's name or username and press Enter to search for specific accounts.
- Details / Summary Toggle:
- Details View: Displays individual login sessions with specific timestamps.
- Summary View: Groups logins by user to show aggregated login counts.
- Export All to Excel: Downloads the entire unfiltered login dataset directly to an Excel spreadsheet.
- Export to Excel: Downloads only the currently filtered and visible table data to an Excel spreadsheet.
Logins Table
The main table displays the login records based on your active filters and search criteria.
- Choose Columns: Click this dropdown in the table header to select which columns to display (such as Department, Location, or Job Title).
- Table Headers: Click on the Username header (or other enabled headers) to sort the records in ascending or descending order.
Common Actions
| Action | How to do it |
|---|---|
| Filter by Date Range | Click the date range selector in the top-right header, select your start and end dates, and click Apply. |
| Switch to Summary View | Click the toggle switch next to Details / Summary so that Summary is highlighted. |
| Filter by Department | Click the Department dropdown, check the boxes next to the desired departments, and click outside the dropdown to apply. |
| Export Current View | Apply your desired filters, then click the green Export to Excel button. |
| Show/Hide Columns | Click the Choose Columns dropdown in the table header and check or uncheck the columns you want to display. |
| Expand Table to Full Screen | Click the Maximize (expand) icon in the top-right corner of the card header. Click it again to exit full screen. |
Tips
- Audit Inactive Users: Use the status filter in the header to view login history for inactive users. This is helpful for compliance audits or when reviewing past system access.
- Speed Up Large Reports: If you are managing a large organization, use the Summary view to quickly see overall login counts per user instead of loading thousands of individual session timestamps in the Details view.
- Find Untagged Users: When filtering by Department, Location, or Job Title, you can select the "None (not selected)" option to identify users who have not been assigned to any organizational categories.