Enrollment Keys — Create
Last updated on: 2026-05-26 | Updated by: MAGNI Docs Team
The Enrollment Keys — Create page allows administrators to generate new enrollment keys (also known as invite tokens) for users. These keys allow users to self-register and automatically receive access to specific courses, quizzes, departments, groups, and roles.
Page Sections
Header Actions
The header contains the breadcrumb navigation and the primary action buttons for managing the creation process.
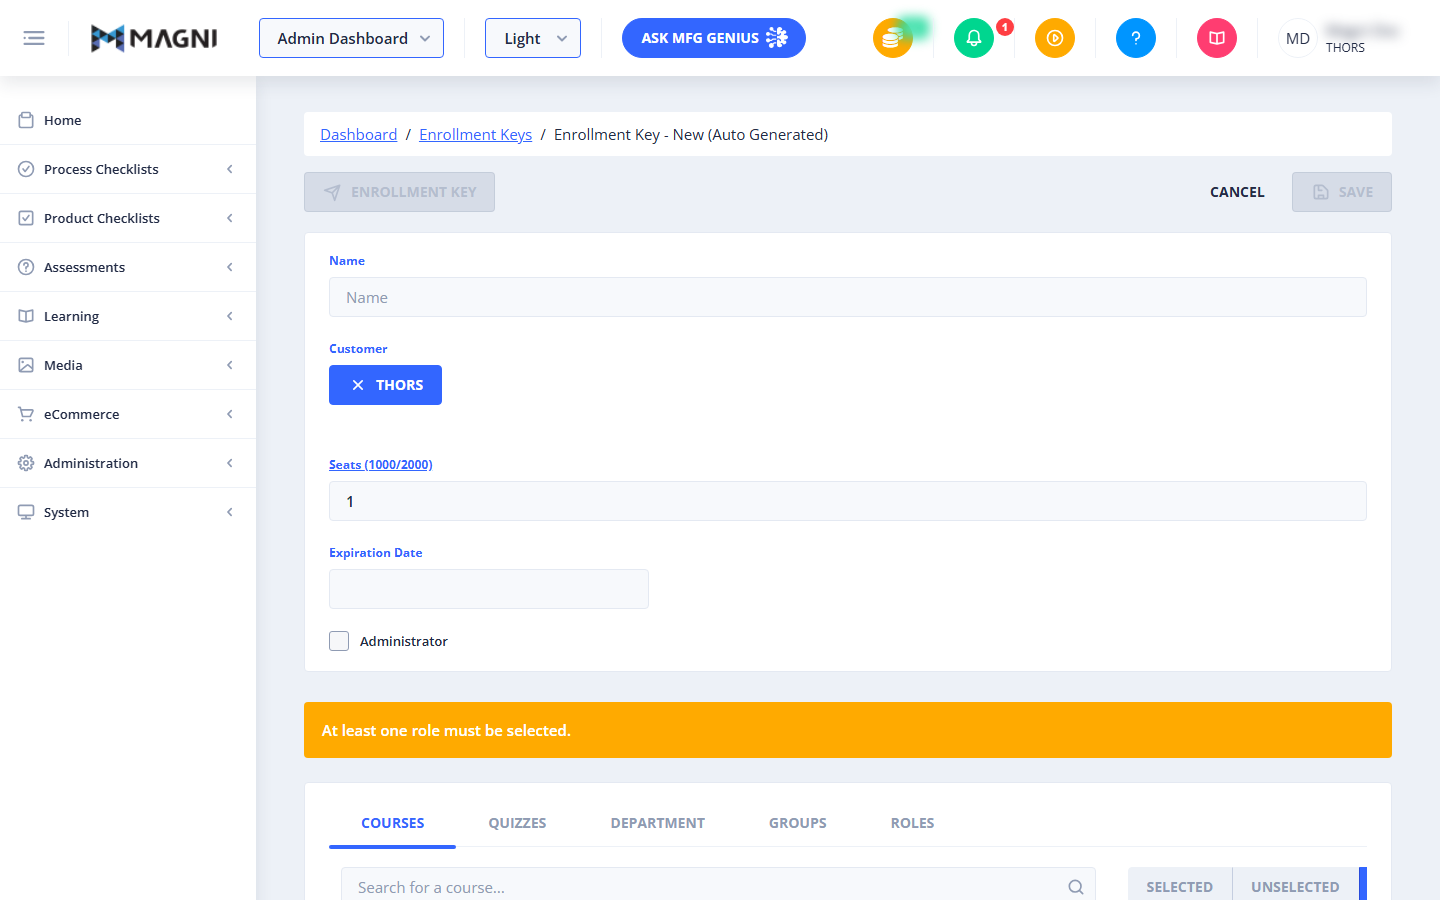
- Enrollment Key Status Button: A disabled status button that displays "Enrollment Key" during creation. Once saved, this will display the auto-generated token.
- Cancel: Aborts the creation process and returns you to the Enrollment Keys list page.
- Save: Saves the new enrollment key. This button remains disabled until all required fields are filled out, validation rules are met, and at least one role is selected.
Enrollment Key Details
This section contains the core configuration fields for the enrollment key.

-
Name: Required. A descriptive name for the enrollment key to help identify its purpose (e.g., "Q3 Onboarding").
-
Customer:
👤 Visible to: THORS Administrators
Allows searching and selecting a customer to associate with this enrollment key. If a customer is selected, the available seats and LMS/Assessment features will adjust dynamically based on that customer's settings.
-
Seats: Required. The number of registration slots allocated to this key. A helper label displays the remaining available seats relative to the customer's total limit (e.g.,
1000/2000). The value must be 0 or greater. -
Expiration Date: Required. The date when the enrollment key will expire and no longer accept new registrations. This must be set to today's date or a future date.
-
Administrator Checkbox: When checked, any user who registers using this enrollment key will automatically be granted Administrator privileges.
Validation Warning
An orange warning banner displays if the validation requirements are not met.
- At least one role must be selected: This warning appears if you have not assigned any roles to the enrollment key. You cannot save the enrollment key while this warning is active.
Configuration Tabs
The bottom portion of the page features tabs that allow you to assign specific content, structures, and permissions to anyone who registers with this key.
Courses
ℹ️ Only visible if the selected customer has the Learning Management System (LMS) feature enabled.
Allows you to select which courses are automatically assigned to users who register with this key. You can search, filter, and select multiple courses.
Quizzes
ℹ️ Only visible if the selected customer has the Assessments feature enabled.
Allows you to select which quizzes are automatically assigned to users who register with this key.
Department
Allows you to designate a single department that new users will be automatically assigned to upon registration.
- Only one department can be selected.
- If a department is already selected, you must click the X button next to its name to remove it before searching for and selecting a different one.
Groups
Allows you to select one or more user groups that registering users will automatically join.
Roles
Allows you to select the user roles (e.g., Student, Instructor) assigned to users registering with this key. At least one role must be selected to save the enrollment key.
Common Actions
| Action | How to do it |
|---|---|
| Create an Enrollment Key | 1. Enter a Name. 2. (THORS Admins only) Search for and select a Customer. 3. Enter the number of Seats. 4. Select an Expiration Date. 5. (Optional) Check Administrator if users should have admin rights. 6. Select at least one role in the Roles tab. 7. Configure any optional Courses, Quizzes, Departments, or Groups. 8. Click Save. |
| Assign a Department | 1. Navigate to the Department tab. 2. Use the search bar to find your desired department. 3. Click on the department in the search results table to select it. |
| Remove a Selected Department | 1. Navigate to the Department tab. 2. Click the blue button containing the department's name and the X icon to clear the selection. |
Tips
- Check Your Seat Limits: Keep an eye on the seat counter next to the Seats label. Ensure you do not allocate more seats than are available in your customer contract.
- Set Realistic Expirations: Always set the expiration date to cover the entire duration of your training cohort. If a key expires early, users will not be able to register.
- Always Assign Roles First: Because saving requires at least one role, navigate to the Roles tab early in your setup process to clear the validation warning.