Enrollment Keys — Detail
Last updated on: 2026-05-26 | Updated by: MAGNI Docs Team
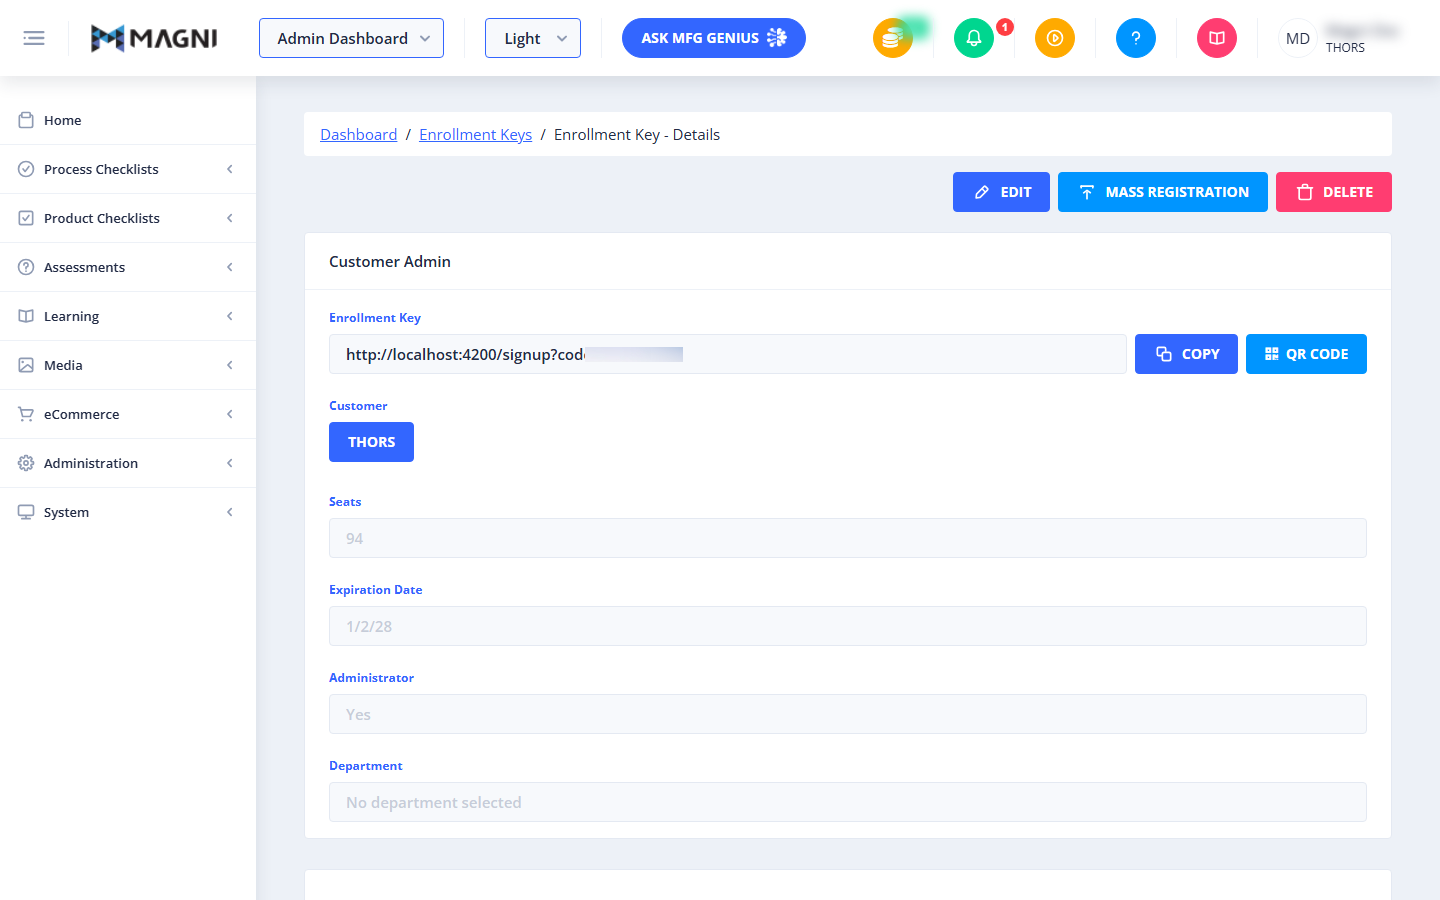
The Enrollment Keys — Detail page provides a comprehensive view of a specific enrollment key (invite) within the Magni platform. Administrators use this page to manage registration links, monitor seat allocations, generate QR codes for easy registration, and view associated courses, quizzes, groups, and roles.
Page Sections
Breadcrumbs & Header Actions
At the top of the page, breadcrumbs help you navigate back to the Dashboard or the main Enrollment Keys list. On the right, several administrative actions are available depending on your user permissions:
- Edit: Modifies the enrollment key settings.
- Mass Registration: Allows uploading a list of users to register them in bulk using this key.
- Delete: Permanently removes this enrollment key after a confirmation prompt.
Enrollment Key Details Card
This card displays the core configuration of the enrollment key:
- Enrollment Key: A read-only field showing the unique signup URL.
- Copy: Click to copy the signup URL directly to your clipboard.
- QR Code: Click to generate and display a QR code for this key.
- Customer: Displays the customer associated with this key.
👤 Visible to: THORS Staff / System Administrators only.
- Seats: The total number of registration slots allocated to this key.
- Expiration Date: The date when this enrollment key will expire and no longer accept new registrations.
- Administrator: Indicates whether users registering with this key will be granted administrator privileges ("Yes" or "No").
- Department: Displays the department assigned to users who register with this key, or "No department selected" if none is assigned.
Enrollment QR Code Dialog
When you click the QR Code button, a dialog window opens containing:
- QR Code Image: A scannable code that redirects users directly to the signup page.
- URL Field: A read-only display of the signup link.
- Download: Saves the QR code as a PNG image file to your local device.
- Copy: Copies the QR code image to your clipboard for easy pasting into emails or documents.
Associated Content Tabs
The bottom card contains tabs that organize the content and access levels assigned to this enrollment key.
Courses Tab
👤 Visible to: Customers with LMS access enabled.
Displays a list of all courses assigned to this enrollment key. Users who register with this key will automatically receive access to these courses.
Quizzes Tab
👤 Visible to: Customers with Assessments enabled.
Displays a list of all quizzes assigned to this enrollment key.
Groups Tab
👤 Visible to: Customers with LMS or Assessments enabled.
Displays a paginated table listing the groups associated with this enrollment key. Users registering with this key are automatically added to these groups.
Roles Tab
Displays buttons representing the roles assigned to this enrollment key. Clicking a role button navigates to that role's detail page.
Common Actions
| Action | How to do it |
|---|---|
| Copy Signup Link | Click the Copy button next to the Enrollment Key field. |
| Download QR Code | Click QR Code, then click Download in the pop-up dialog. |
| Edit Key Details | Click the Edit button in the top-right corner. |
| Delete Enrollment Key | Click the Delete button in the top-right corner, then confirm the action in the dialog. |
| Perform Bulk Registration | Click the Mass Registration button in the top-right corner to upload user details. |
Tips
- Use QR Codes for Physical Materials: Download the QR code and print it on training flyers, posters, or hand-outs so users can easily scan and register on their mobile devices.
- Monitor Seat Limits: Keep an eye on the Seats field to ensure you have enough remaining capacity for your upcoming user cohorts.
- Quick Role Verification: Use the Roles tab to quickly verify exactly what permissions new users will receive upon registration.