Admin Codes Wizard Step 4
Last updated on: 2026-05-25 | Updated by: MAGNI Docs Team
This page allows administrators to configure notification settings and certificate options for an access code within the Magni Learning Management System. These settings determine who receives notifications about quiz activity and how those notifications are formatted.
Page Sections
The page is structured with a progress stepper at the top, followed by various notification and certificate configuration options, and navigation buttons at the bottom.
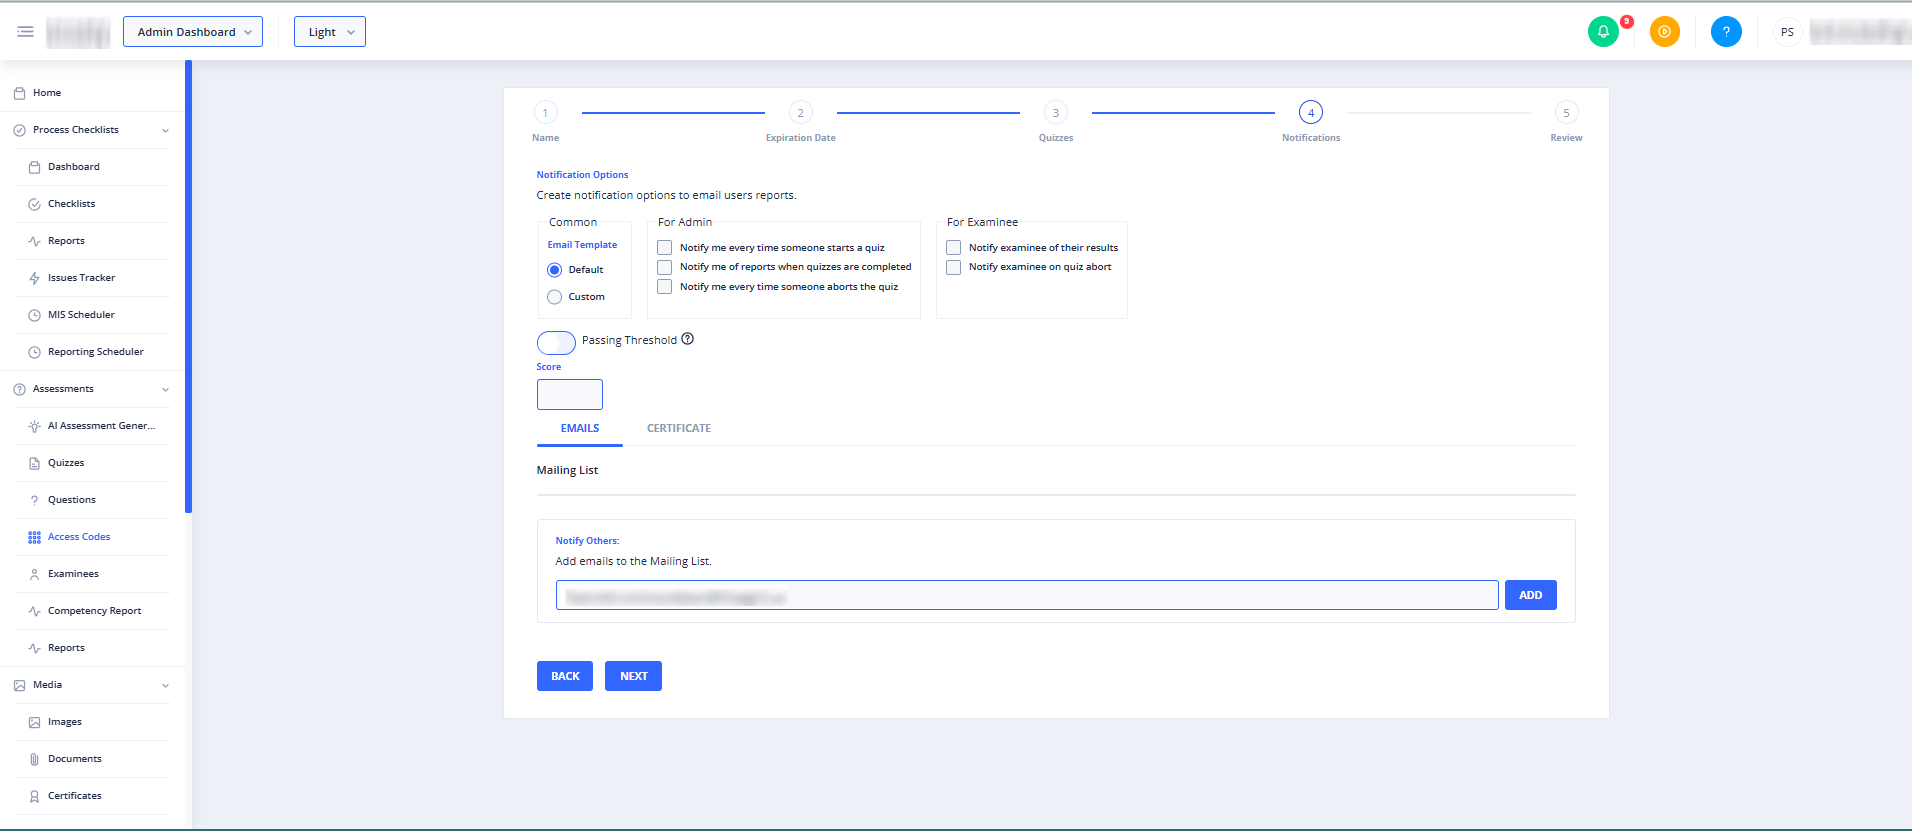
Progress Stepper
At the top of the page, a stepper visually indicates the current step in the access code creation wizard. You are currently on Step 4: Notifications. The steps are:
- Name: Define the access code name.
- Expiration Date: Set the access code's expiration.
- Quizzes: Select the quizzes associated with this code.
- Notifications: Configure notification and certificate settings (current step).
- Review: Review all settings before finalizing.
⚠️ The steps in the stepper are for progress indication only and cannot be clicked to navigate.
Notification Options
This section allows you to create notification options to email users reports and configure other notification settings.
Common
This subsection contains general notification settings.
- Email Template:
- Default: Select this option to use Magni's default email template for notifications.
- Custom: Select this option to define a custom email template. Choosing "Custom" will reveal additional fields under the "Emails" tab to customize the subject and body of the email.
- Message Template:
- Default: Select this option to use Magni's default SMS message template for notifications.
- Custom: Select this option to define a custom SMS message template. Choosing "Custom" will reveal additional fields under the "SMS" tab to customize the body of the message.
👤 Visible to: Administrators whose customer account has SMS functionality enabled.
For Admin
This subsection allows you to configure notifications sent to administrators.
- Notify me every time someone starts a quiz: Check this box to receive an email notification whenever a user begins a quiz associated with this access code. If checked, your email address will automatically be added to the Mailing List under the "Emails" tab if it's not already there.
- Notify me of reports when quizzes are completed: Check this box to receive an email notification with a report when a user completes a quiz associated with this access code. If checked, your email address will automatically be added to the Mailing List under the "Emails" tab if it's not already there.
- Notify me every time someone aborts the quiz: Check this box to receive an email notification whenever a user aborts a quiz associated with this access code.
For Examinee
This subsection allows you to configure notifications sent to the examinee (the user taking the quiz).
- Notify examinee of their results: Check this box to send an email notification to the examinee with their quiz results upon completion.
- Notify examinee on quiz abort: Check this box to send an email notification to the examinee if they abort a quiz.
Passing Threshold
This component allows you to set a passing threshold for the quizzes.
- Threshold Value: Enter a percentage value (e.g., 70 for 70%). If a value greater than 0 is set, it enables a separate email/SMS template for examinees who pass the quiz.
- Threshold Tooltip: Hover over the information icon next to "Passing Threshold" for a tooltip explaining its purpose: "Passing thresholds set for the code wizard."
- Toggle: You can toggle the passing threshold on or off for this access code.
Tabs
This section contains tabs for configuring email, SMS, and certificate options.
Emails Tab
This tab allows you to manage email notifications and customize email templates.
- Information Alert:
The email of the examinee does not need to be in this list for the examinee to receive a report. This alert is visible if "Notify examinee of their results" is checked in the "For Examinee" section.
- Mailing List: This list displays all email addresses that will receive notifications configured in the "For Admin" section.
- Email Address: Each item in the list is an email address.
- Remove Button: Click the "Remove" button next to an email address to delete it from the mailing list.
- Warning Alert:
There are no emails in the list. No email notifications will be sent. This alert is visible if "Notify me every time someone starts a quiz" or "Notify me of reports when quizzes are completed" is checked, but the Mailing List is empty.
- Notify Others: This section allows you to add new email addresses to the Mailing List.
- Enter Email (Input Field): Type the email address you wish to add.
- Validation: If you enter an invalid email address, a "You have entered an invalid email address. Please try again." message will appear below the input field.
- Add (Button): Click this button to add the entered email address to the Mailing List.
- Enter Email (Input Field): Type the email address you wish to add.
- Passing Email Template: This section appears if "Custom" is selected for "Email Template" under "Common" and if a "Passing Threshold" greater than 0 is set. It allows you to customize the email sent when an examinee passes the quiz.
- Subject Text (Input Field): Enter the subject line for the passing email.
- Body Text (Textarea): Enter the body content for the passing email.
- Variables (List): This list provides dynamic variables you can use in your email subject and body text. These variables will be replaced with actual data when the email is sent. Examples include:
- {{quiz_name}}
- {{examinee_name}}
- {{score}}
- {{pass_fail}}
- {{certificate_url}}
- {{date_completed}}
- {{quiz_url}}
- Failing Email Template: This section appears if "Custom" is selected for "Email Template" under "Common" and if a "Passing Threshold" greater than 0 is set. It allows you to customize the email sent when an examinee fails the quiz.
- Subject Text (Input Field): Enter the subject line for the failing email.
- Body Text (Textarea): Enter the body content for the failing email.
- Variables (List): This list provides dynamic variables you can use in your email subject and body text. These variables will be replaced with actual data when the email is sent. Examples include:
- {{quiz_name}}
- {{examinee_name}}
- {{score}}
- {{pass_fail}}
- {{certificate_url}}
- {{date_completed}}
- {{quiz_url}}
- Email Template: This section appears if "Custom" is selected for "Email Template" under "Common" and if no "Passing Threshold" is set (i.e.,
passThresholdis 0). It allows you to customize the general email template.- Subject Text (Input Field): Enter the subject line for the email.
- Body Text (Textarea): Enter the body content for the email.
- Variables (List): This list provides dynamic variables you can use in your email subject and body text. Examples include:
- {{quiz_name}}
- {{examinee_name}}
- {{score}}
- {{pass_fail}}
- {{certificate_url}}
- {{date_completed}}
- {{quiz_url}}
SMS Tab
This tab allows you to manage SMS notifications and customize message templates.
👤 Visible to: Administrators whose customer account has SMS functionality enabled, and "Custom" is selected for "Message Template" under "Common".
- Information Alert:
The mobile number of the examinee does not need to be in this list for the examinee to receive a report. This alert is visible if "Notify examinee of their results" is checked in the "For Examinee" section.
- Mailing List: This list displays all mobile numbers that will receive SMS notifications.
- Mobile Number: Each item in the list is a mobile number.
- Remove Button: Click the "Remove" button next to a mobile number to delete it from the mailing list.
- Warning Alert:
There are no mobile numbers in the list. No SMS notifications will be sent. This alert is visible if "Notify me every time someone starts a quiz" or "Notify me of reports when quizzes are completed" is checked, but the SMS Mailing List is empty.
- Notify Others: This section allows you to add new mobile numbers to the Mailing List.
- Country Code (Dropdown): Select the country code for the mobile number.
- Enter Mobile (Input Field): Type the mobile number you wish to add.
- Validation: If you enter an invalid mobile number, a "You have entered an invalid mobile number. Please try again." message will appear below the input field.
- Add (Button): Click this button to add the entered mobile number to the Mailing List.
- Passing SMS Template: This section appears if a "Passing Threshold" greater than 0 is set. It allows you to customize the SMS sent when an examinee passes the quiz.
- Body Text (Textarea): Enter the body content for the passing SMS.
- Variables (List): This list provides dynamic variables you can use in your SMS body text. Examples include:
- {{quiz_name}}
- {{examinee_name}}
- {{score}}
- {{pass_fail}}
- {{certificate_url}}
- {{date_completed}}
- {{quiz_url}}
- Failing SMS Template: This section appears if a "Passing Threshold" greater than 0 is set. It allows you to customize the SMS sent when an examinee fails the quiz.
- Body Text (Textarea): Enter the body content for the failing SMS.
- Variables (List): This list provides dynamic variables you can use in your SMS body text. Examples include:
- {{quiz_name}}
- {{examinee_name}}
- {{score}}
- {{pass_fail}}
- {{certificate_url}}
- {{date_completed}}
- {{quiz_url}}
- SMS Template: This section appears if no "Passing Threshold" is set (i.e.,
passThresholdis 0). It allows you to customize the general SMS template.- Body Text (Textarea): Enter the body content for the SMS.
- Variables (List): This list provides dynamic variables you can use in your SMS body text. Examples include:
- {{quiz_name}}
- {{examinee_name}}
- {{score}}
- {{pass_fail}}
- {{certificate_url}}
- {{date_completed}}
- {{quiz_url}}
Certificate Tab
This tab allows you to associate a certificate with the access code.
👤 Visible to: Administrators whose customer account has certificate functionality enabled.
- Certificate URL (Input Field): Enter the URL of the certificate you wish to associate with this access code.
- Upload (Button): Click this button to upload a certificate file.
- Preview (Button): Click this button to preview the certificate currently linked.
Navigation Buttons
- BACK (Button): Click this button to return to the previous step (Step 3: Quizzes) of the access code wizard. Your current notification settings will be saved.
- NEXT (Button): Click this button to