Last updated on: 2026-05-26 | Updated by: MAGNI Docs Team
Process Checklists — Tagging
The Process Checklists — Tagging page allows administrators to assign and manage organizational tags for specific process checklists. By tagging checklists, administrators can easily categorize, filter, and organize content across the Magni platform, making it simpler for users to find relevant checklists.
Overview
Tagging is an essential administrative tool for maintaining an organized library of checklists. This page provides a centralized interface to view currently applied tags, add new tags from existing categories, or remove tags that are no longer relevant to the checklist.
Page Sections
Breadcrumb Navigation
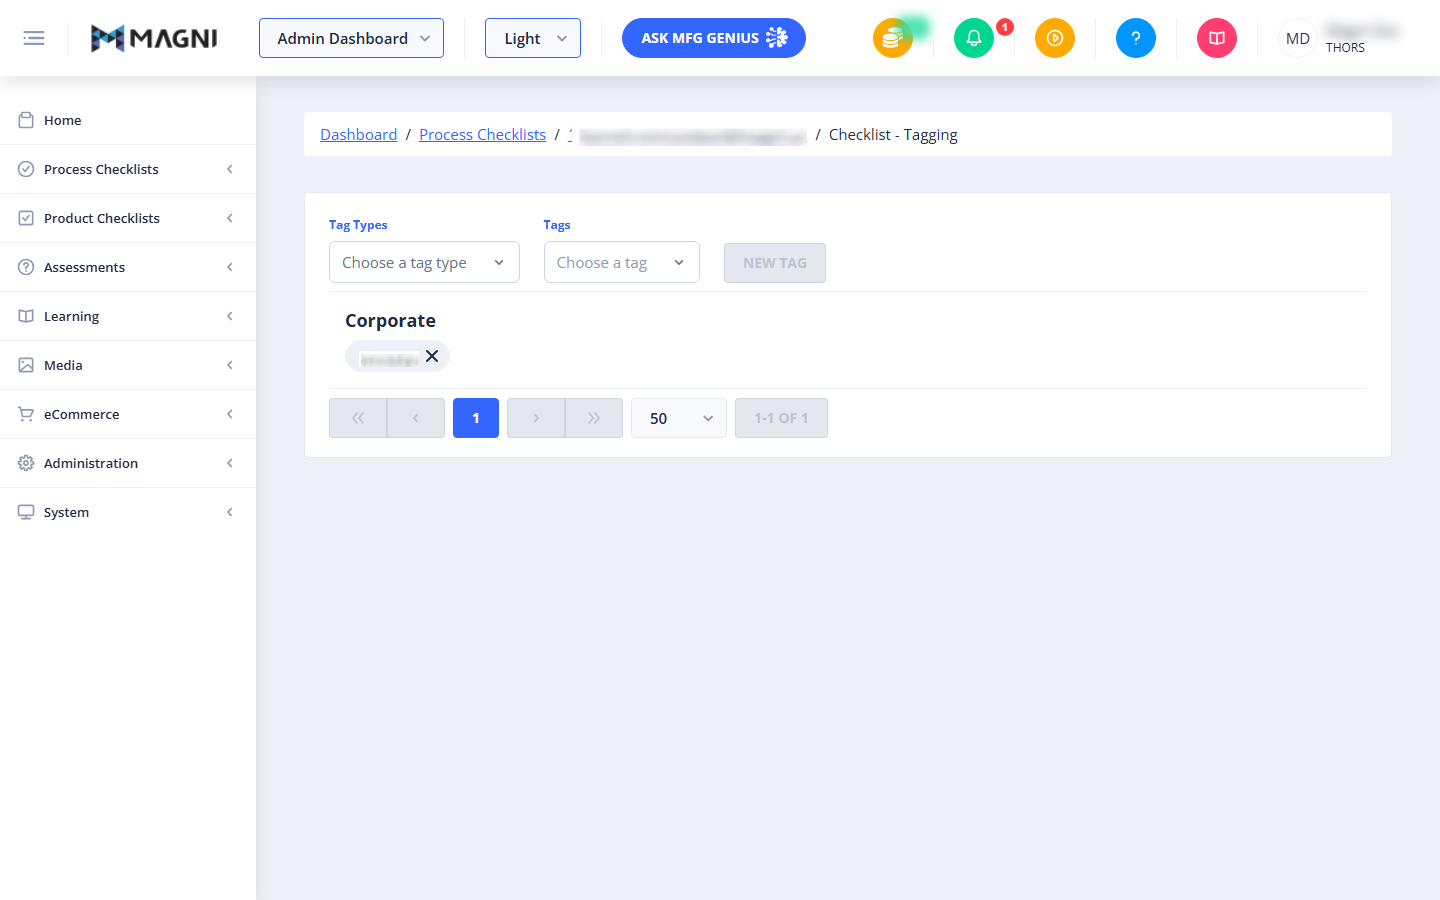
Located at the top of the page, the breadcrumb trail shows your current location within the system (e.g., Dashboard / Process Checklists / Checklist Name / Checklist - Tagging). You can click any of the active links in this trail to quickly navigate back to previous screens.
Tagging Workspace
This is the main card where you manage all tags associated with the checklist.
- Tag Types Dropdown: Select the category or type of tag you want to apply (e.g., Corporate, Department, Location).
- Tags Dropdown: Select the specific tag value within the chosen tag type.
- New Tag Button: Applies the selected tag type and tag to the checklist. This button becomes active once you have made selections in both dropdowns.
- Applied Tags List: Displays all tags currently assigned to the checklist, grouped by their Tag Type (for example, "Corporate" with the active tag "THORS"). Each applied tag features an "X" icon next to its name for easy removal.
- Pagination Controls: Located at the bottom of the workspace, these controls help you navigate through applied tags if there are multiple pages of tags assigned.
Feature Not Enabled State
If the Checklists feature has not been enabled for your organization's account, the tagging workspace will be hidden, and a "Feature Not Enabled" notification will display on the screen instead.
Common Actions
| Action | How to do it |
|---|---|
| Add a Tag | 1. Select a category from the Tag Types dropdown. 2. Select a specific tag from the Tags dropdown. 3. Click the New Tag button to apply it to the checklist. |
| Remove a Tag | Click the X icon next to the applied tag name (such as THORS) in the Applied Tags list. |
| Navigate Back | Click the checklist name or Process Checklists in the breadcrumb trail at the top of the page. |
Tips
- Consistent Categorization: Use standardized Tag Types (like "Corporate" or "Department") to keep your checklists consistently organized across the entire platform.
- Multi-Tagging: You can apply multiple tags from different Tag Types to a single checklist to make it discoverable under various search criteria.
- Check Feature Status: If you cannot see the tagging workspace and instead see a "Feature Not Enabled" message, contact your system administrator to enable the Checklists feature for your customer account.