Last updated on: 2026-05-26 | Updated by: MAGNI Docs Team
Product Checklists
Overview
The Product Checklists page allows administrators to manage, organize, and configure quality control checklists for products. This centralized dashboard is used to create new checklists, filter existing ones by categories or tags, and export checklist data for external reporting.
Page Sections
Header Controls
The header contains the primary actions for managing and finding checklists.
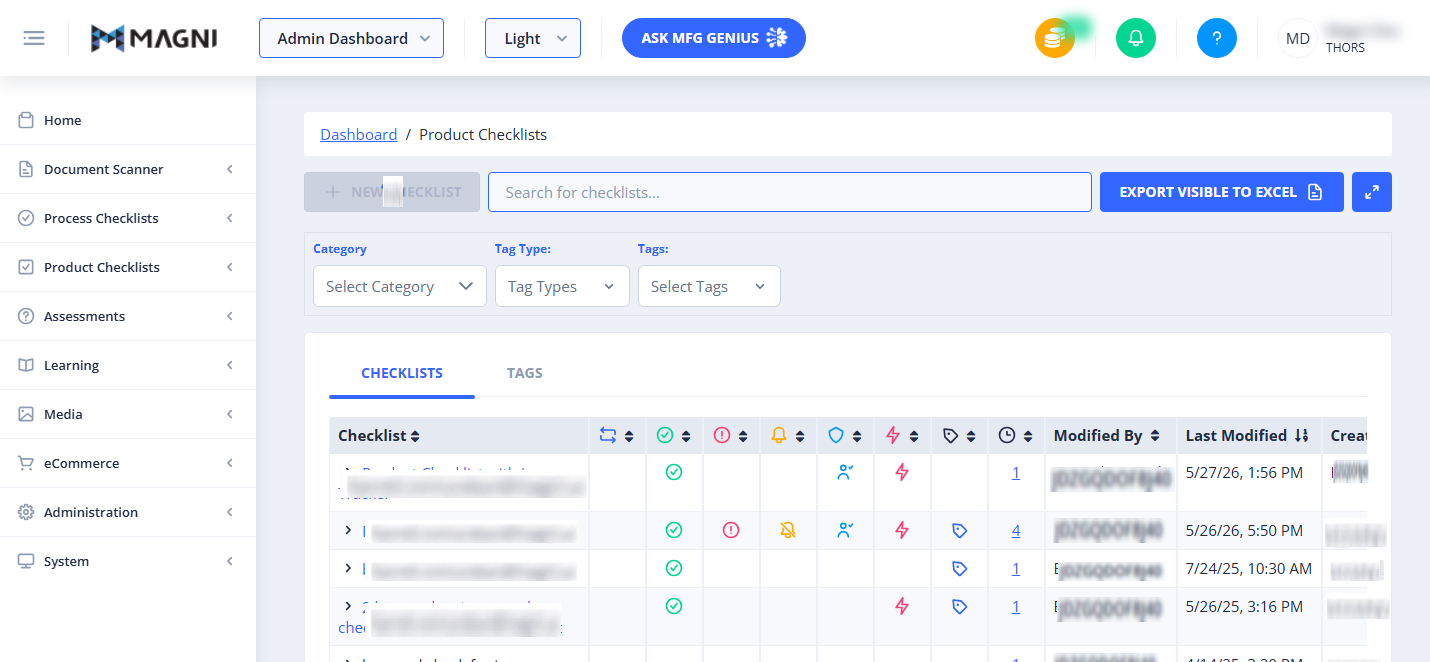
- New Checklist Button: Click this button to open the creation form for a new checklist.
👤 Visible to: Users with Checklist Create permissions.
- Search Bar: Type in this field to instantly filter the checklists table by name.
- Export Visible to Excel: Exports the currently displayed table data directly to an Excel spreadsheet. This button is disabled if there are no checklists or templates available in the current view.
- Toggle Filters Button: Click this button to show or hide the advanced filters panel.
Filters Panel
Expand this panel using the toggle button in the header to narrow down the checklists displayed in the table.
- Category: A multi-select dropdown that filters the list to show only checklists belonging to the selected categories.
- Filter by Tags: Allows you to filter checklists by selecting specific tags and tag types.
- Selected Tags: Displays any currently active tag filters. You can remove individual tag filters from here.
Checklists Table
The main table displays your checklists and their current configurations. You can switch between different views using the tabs at the top of the table.
- Checklist Column: Displays the name of the checklist. Click the column header to sort the list alphabetically.
- Frequency Column (indicated by the repeat icon): Shows how often the checklist is scheduled to be completed. Click the column header to sort by frequency.
- Published Column (indicated by the checkmark icon): Displays whether the checklist is published and active. Click the column header to sort by publication status.
- Alerts Enabled Column (indicated by the alert icon): Shows if automated alerts are enabled for the checklist. Click the column header to sort by alert status.
- Reminder (Reminder Icon): Shows whether a reminder is configured for the checklist. Reminders trigger automated emails to operators or admins before or after the scheduled execution time, ensuring the checklist is not missed.
- Authorized (Authorized Icon): Indicates whether the checklist is private/restricted. Authorized checklists are not public — only permitted users can access and execute them.
- Issue Tracker (Issue Tracker Icon): Shows whether the Issues Tracker feature is enabled for the checklist. When enabled, specific users are designated as Issues Owners who are assigned to resolve issues flagged during checklist execution.
- Has Tags (Has Tags Icon): Indicates whether tags have been assigned to the checklist. Tags help administrators organize and categorize checklists across the platform for structured management.
- Revision(Revision icon): Displays how many times the checklist has been edited. The revision count increases with each update
- Modified By(Modified by icon): Shows the name of the user who last made changes to the checklist.
- **Last Modified(Last Modified icon):**Displays the date and time when the checklist was most recently updated.
- Created By(Created By icon): Shows the name of the user who originally created the checklist.
- Launch Date(Launch Date icon): Indicates the date from which the checklist becomes available for execution.
Create New Checklist Dialog
When you click the New Checklist button, a dialog window opens containing the following fields:
- Name: (Required) Enter a unique, descriptive name for the checklist.
- Is Template: (Required) Toggle this option on if you want to save this checklist as a reusable template rather than an active checklist.
- Sample Size: (Required for Product Checklists) Enter the number of items to be sampled during this check. This field defaults to 3.
Common Actions
| Action | How to do it |
|---|---|
| Create a New Checklist | 1. Click the New Checklist button in the top-left. 2. Fill in the required Name and Sample Size fields. 3. Toggle Is Template if you are creating a reusable template. 4. Save the checklist. |
| Search for a Checklist | Type the checklist's name into the Search for checklists... input field. The table updates automatically as you type. |
| Filter by Category | 1. Click the Toggle Filters button to expand the filters panel. 2. Click the Category dropdown. 3. Check the boxes next to the categories you want to display. |
| Export to Excel | Click the Export Visible to Excel button in the top-right to download a spreadsheet containing only the currently filtered table rows. |
Tips
- Utilize Templates: If you have standard checks that apply to multiple products, create them as templates first. This allows you to quickly generate new checklists without starting from scratch.
- Keep Tags Organized: Consistently tag your checklists to make filtering and reporting much faster as your checklist library grows.
- Check Your Permissions: If the New Checklist button is missing or disabled, contact your system administrator to ensure your user role has checklist creation permissions enabled.